Installing and configuring Microsoft Visual SourceSafe
for Internet (Remote) access
Visual SourceSafe Internet is a source control MSSCCI plugin for Visual Studio
that allows remote access to VSS databases. Configuring VSS for Internet access
may require in the best case only enabling 2 checkboxes in admin interface, but
in the worst case may require granting permissions or instaling and accepting
certificates. I believe that someone not familiar with SourceSafe will find it
difficult to set all options correctly for Remote access, therefore I decided
to write this page as a step-by-step tutorial. In the examples below I'll use
the worst case scenario: 2 computers not in the same domain, new vss database
without matching Windows users, untrusted SSL certificate, etc.
The name of the server computer in my home network is ALINC-HOME, and it is
visible on the Internet using http://alinconstantin.dtdns.net address.
I logged in on the home machine as ALINC-HOME\Alin to configure the VSS for
remote access.
I want to create a SourceSafe database on the home machine, and access it from
the work network, where I'm logged in on ALINC00 machine joined to REDMOND
domain as REDMOND\alinc.
(The pictures below that have the XP Luna style are from the work machine,
while the pictures with the classic Windows style are from the home machine)
Installing Microsoft Visual SourceSafe Internet
-
You need to install Microsoft Visual SourceSafe on both client and server
machine (server is the machine that will host the VSS database).
-
On Server, select Custom Install and make sure you select the "Server
Components" (or at least the HTTP Remote Access component); they are not
installed in Default installation confuguration.
-
On Client machine, you can select the Default (although I see no reason for
doing this - you only save about 600kb disk space).
-
After installing Visual SourceSafe, you must select the VSS Internet plugin as
the active source control provider.
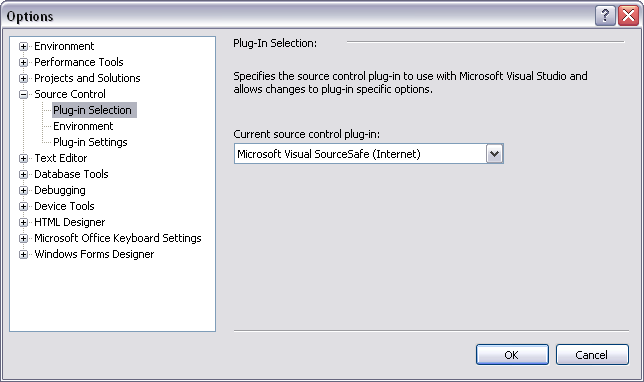
If you use Visual Studio 2005, you can use Tools/Options menu, select the
SourceControl/Plug-in Selection page in the options tree, and in the combobox
select the "Microsoft Visual SourceSafe (Internet)" plugin, like in the picture
below:
If you use Visual Studio 2003 or older you will need to use a 3rd party MSSCCI
switcher. To obtain one, you can search google or download the
SccSwitcher by Soenke
Schau. You can also manual switch between the active providers by
manually registering with regsvr32 the MSSCCI dll (ssscc.dll for VSS/LAN and
RemoteVssScc.dll for VSS/Internet).
Setting up SourceSafe and VisualStudio for Internet access (HTTP)
Because the communication with the server is not secure when HTTP protocol is
used, I would recommend this configuration only if you're trying to access a
VSS database that is in the same LAN (that you can also access with LAN plugin)
but when the direct LAN connection to the server is too slow. Using VSS
Internet plugin should provide a perfomance improvement over using the LAN
plugin over slow networks.
I'd also recommend trying this configuration as a step first when you're
configuring your database for SSL access.
-
For start, on the server machine, use SourceSafe Administrator program
(ssadmin) to create the database. Open SSAdmin and select File/New Database
menu, then follow the wizard. I selected for the database location
D:\Programming\VssDB. Since this will be a new database, it will only have the
default VSS accounts(Admin and Guest) plus an account for the current user on
server (Alin).
-
To enable the database for remote access, you'll need the database to be
shared. I used WindowsExplorer and shared the D:\Programming\VssDB folder as
\\alinc-home\VssDB.
-
In SSAdmin, use the File/Open Database menu. Click Add button in the open
dialog and re-add the database with the UNC location (\\alinc-home\VssDB).
-
After opening the database in SSAdmin from the share location, the
Server/Configure menu item can be used.
-
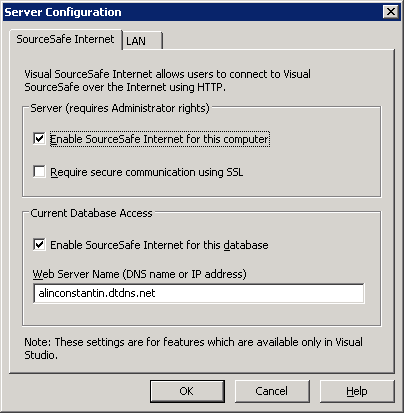
In the Server Configuration dialog, select the SourceSafe Internet tab and
check "Enable SourceSafe Internet for this computer" and "Enable SourceSafe
Internet for this database" checkboxes.
-
In the web server name box, type in the name of the server as it will be
visible from Internet, in my case 'alinconstantin.dtdns.net', and click Ok
button.
-
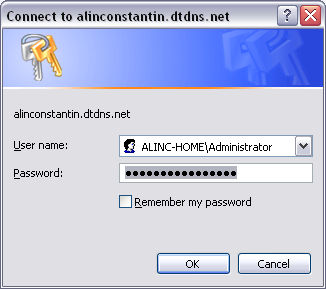
If everything went ok you should be able to access the service from Internet
Explorer. You can verify this by opening the web service URL in Internet
Explorer: http://alinconstantin.dtdns.net/SourceSafe/VssService.asmx You may
get a login dialog, where you need to use a Windows account that is valid on
the server (or on the server's domain). In my case, I selected to login as
ALINC-HOME\Administrator. (Note: in real-life you should not use an account
with administrative privileges like the Administrator account. You should
instead create and use a regular user account with restricted privileges to
access SourceSafe databases over Internet.)
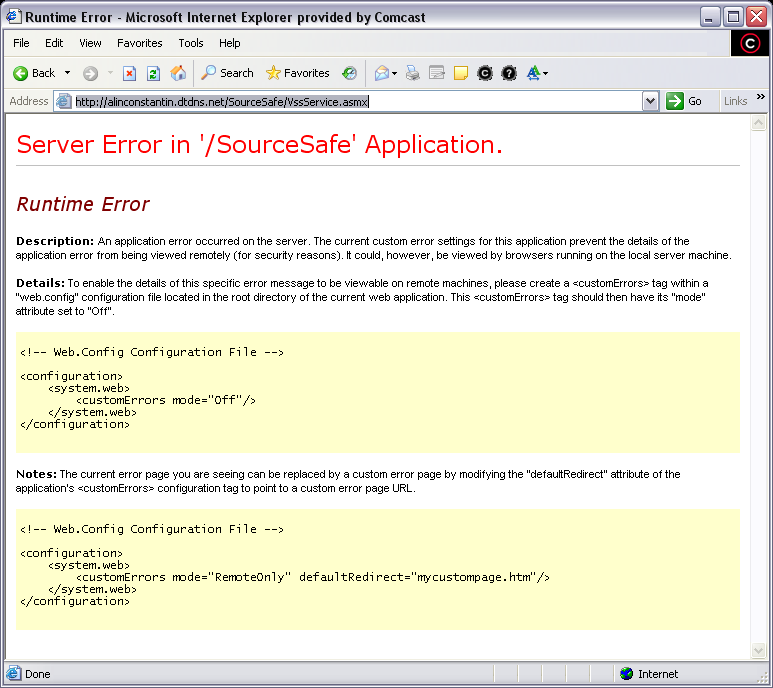
If the server was configured correctly, you will get a "Server Error in
/SourceSafe application" page. This is expected; for security reasons, VSS Web
Service is configured to disallow browsing the service functions. It is
recommended to leave these settings unchanged. (If you really must alter the
settings to convince yourself the service is working, you can edit the
web.config file for the service and change the custom error mode to off
(<customErrors mode="Off"/>) and delete the <remove
name="Documentation"/> line).
-
The VSS web service uses impersonation. This means that Windows account used to
authenticate with the server must also be granted read-write access to the
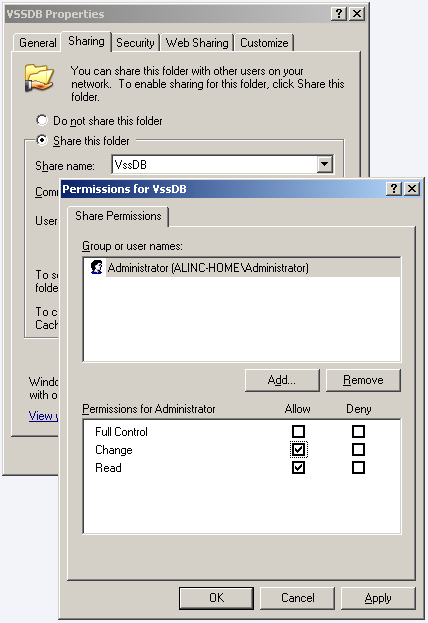
dabase share. Using WindowsExplorer on the server, set the share permissions to
allow write access to the database share. In my case, I will need to grant
read-write access to the ALINC-HOME\Administrator account.
-
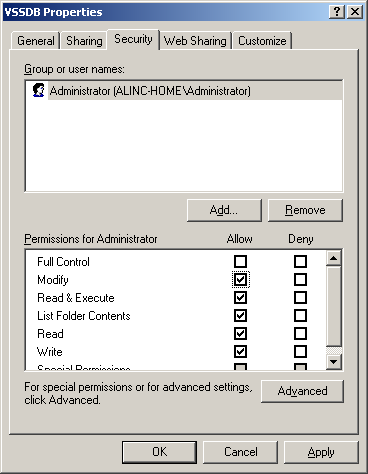
If your database is on NTFS partition (which is recommended, for stronger
security), you must also set the NTFS permissions for the folder.
-
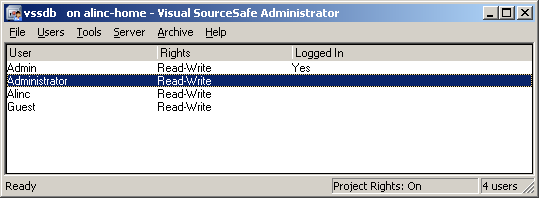
When SSL is not used to connect to the web service, VSS client will not pass
any user names or passwords to the service. Because the VSS web service uses
impersonation, the username of the Windows account used for authentication with
IIS (ALINC-HOME\Administrator) will also be used as a VSS account when
attempting to open the database. Do not forget to add the user as a VSS user
(in my case, I'll have to add an 'Administrator' account as a VSS user)
-
Your SourceSafe database must allow automatic logon with network names (this is
the default and can be verified in SSAdmin, Tools/Options/General/"Use Network
name for automatic user log in").
-
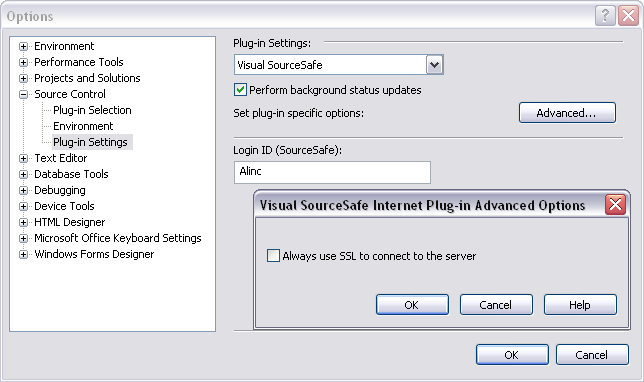
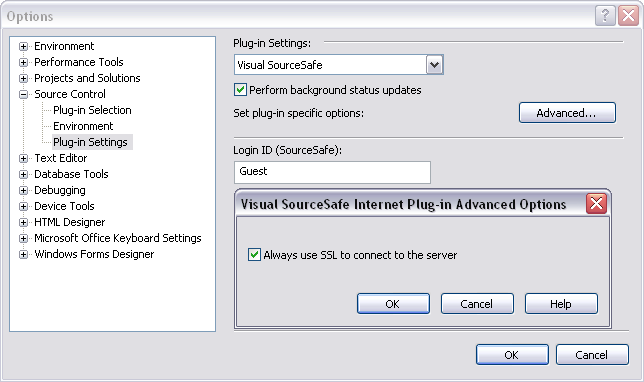
It is now time to configure Visual Studio to be able to access the service. On
the client machine, in VisualStudio access the plugin's Advanced options. If
you're using VS2005 this is available under Tools/Options/SourceControl/Plug-in
Settings/Advanced. If you're using VS2002 or VS2003 this is under
Tools/Options/SourceControl/SCC Provider/Advanced. In the Advanced options
dialog, turn off the "Always use SSL to connect and close the options pages and
click OK in the Advanced options dialog.
Note that although Visual Studio has a Login ID field in the Plug-in Setting
page, the VSS account name specified here will NOT be passed to the web service
when connecting using HTTP! Instead, the web service will use impersonation and
use the 'Administrator' account I used when I authenticated with the server.
-
You can now open the File/Open Project dialog, click the "Visual SourceSafe
(Internet)" tray, use the AddSourceSafeDatabase command and follow the wizard,
typing in the server name and the database share on the server. If everything
was setup correctly in previous steps, clicking Next should connect to the
server without any errors, and you should be able to complete the wizard and
browse the database.
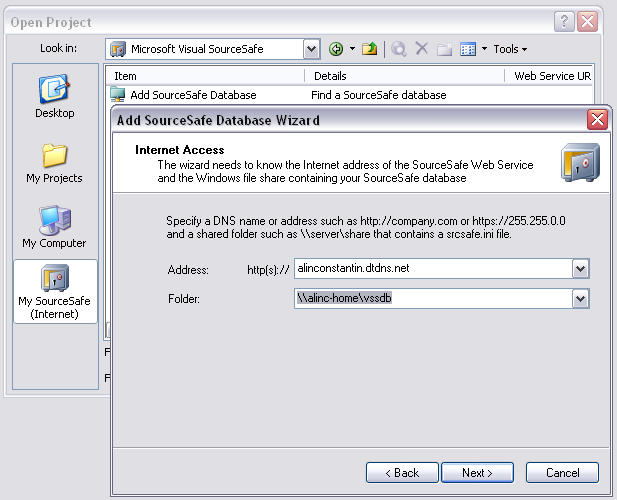
Note: If by clicking the Next button in the wizard you get an error message
that says "The Visual SourceSafe Web Service returned the following error:
(blah)", it means the service is accessible, but it cannot login to the
database; check the settings from steps 8-12. If you get a different error
message you probably have a connection problem, so you should check steps 5-7.
Setting up SourceSafe and VisualStudio for Secure Internet access (HTTPS / SSL)
Before attempting to enable the SourceSafe web service for secure
communication, I strongly advise you to enable it for HTTP access first (it
will help reduce the possibility of a connection failure because you forgot
some database, server or client configuration). In the steps below I'll assume
the database was already enabled for http access, like described in the section
above.
-
First of all, you'll need to obtain and install a certificate on your server.
If you're running Windows Server, you can install and use Certificate Services
(Windows Server component) to request, approve and install the certificate.
This article describes how to
set up Secure Sockets Layer (SSL) that way. If your server machine is
part of a domain, you may already have a certificate assigned automatically
when you joined the domain; in this case you just need to configure IIS to use
that certificate (so you may want to verify this is true by trying to assign an
existing certificate).
In any case, if you don't have a server handy or you don't want to go through
the hassle of learning to use Certificate Services, the easiest way to obtain
and install a certificate on the web server is by using the SelfSSL program
provided free with
IIS 6.0 Resource Kit. See this article describing the procedure for
using SelfSSL to create and install the certificate in IIS. In my case,
I used SelfSSL to create and install a certificate for alinconstantin.dtnds.net
domain. (selfssl.exe /N:cn=alinconstantin.dtdns.net /V:1024)
-
THIS IS IMPORTANT! Visual SourceSafe Web service can be enabled from SourceSafe
Admin only if the certificate is valid and trusted by the server machine.
Attempting to require SSL for the web service when the certificate is not
trusted or invalid will result in the web service being disabled on the
machine!
Similarly, the web service can only be accesed from client machines if the
certificate is valid and trusted by the client machine. For security reasons,
if you attempt to access a service whose certificate is not trusted, the
connection will fail and you'll receive various error messages from
VisualStudio. Here is what you should be careful of:
-
The name of the server specified by the certificate must match exactly the name
of the computer (as you will access it from the client)
-
The name of the server specified by the certificate must match exactly the name
specified in SSadmin/ Server/ Configure/ SourceSafeInternet/ Web Service Name
edit box
-
The certificate issuer must be trusted by server and client machines (If you
used SelfSSL to create the certificat, you'll likely fail this one!)
-
The certificate must not be expired, revoked, etc
Notice that when I created the certificate, the name I passed to selfssl.exe
matched exactly the server name in the URL, and the name from
SSAdmin/Server/Configure. The certificate is also valid. However, certificates
issued with SelfSSL are not trusted (neither on server nor on client), so I'll
have to fix this. -
On the server machine, open an InternetExplorer and browse to the site's URL
(https://alinconstantin.dtdns.net) or to the web service
(https://alinconstantin.dtdns.net/SourceSafe/VssService.asmx) using HTTPS
protocol, to see if the certificate is accepted without any security alert.
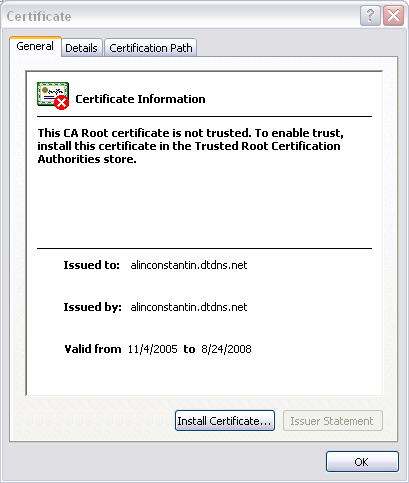
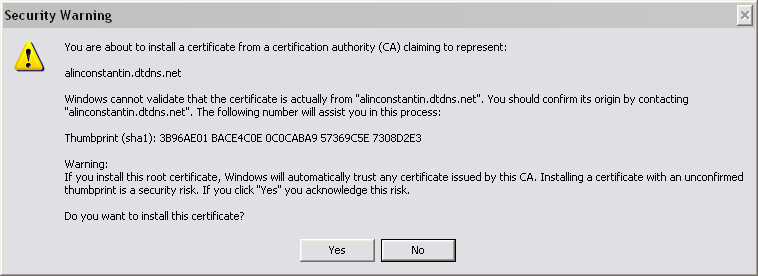
If you're using Internet Explorer 6.0 and the certificate is not trusted,
you'll get a security alert like in the following picture:
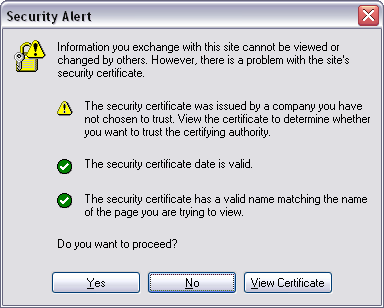
While you can clich Yes button and have the certificate accepted for that
InternetExplorer session, that will not be enough to have the certificate
usable with VSS Internet. You'll have to click the "View Certificate" button to
display and install the certificate first.
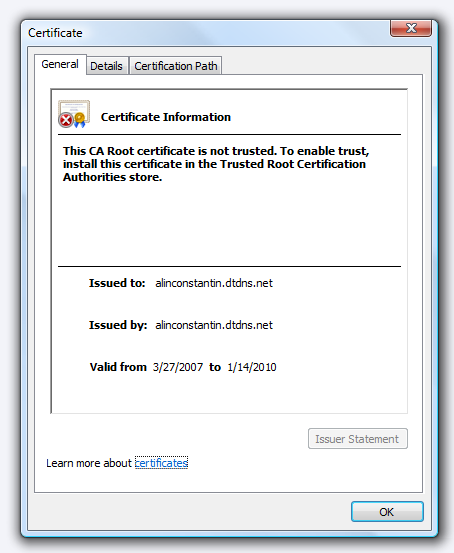
If you're using Internet Explorer 7 and the certificate is not trusted, you'll
see a page blocking access to the website like the one below:
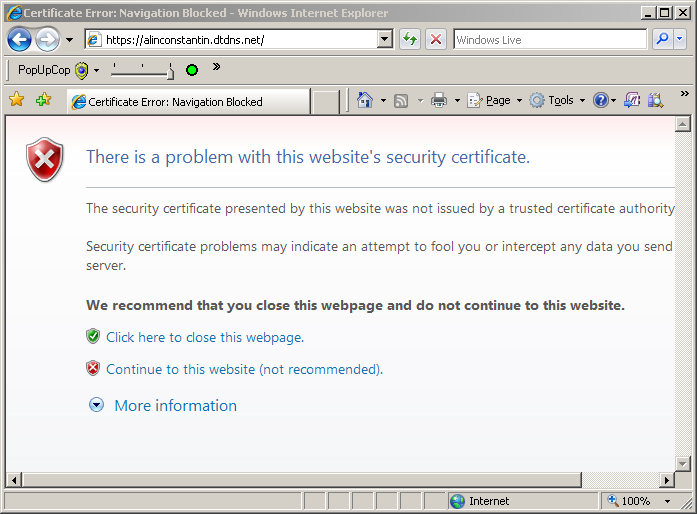
Click the "Continue to this website (not recommended)" link on the page, then
click the "Certificate Error" red notification in the Internet Explorer address
bar. This will display a popup window with additional information about the
certificate error.
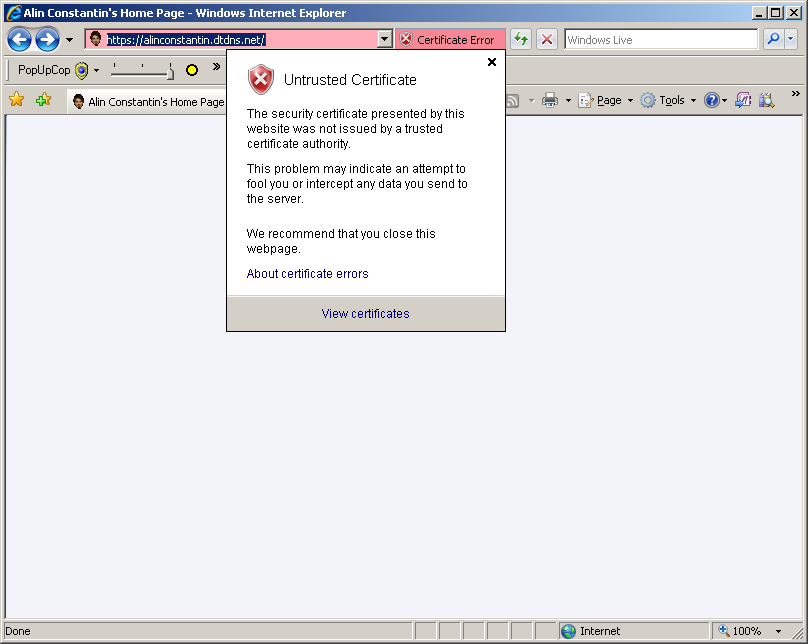
Use the "View Certificate" link in the information popup to display the
certificate information.
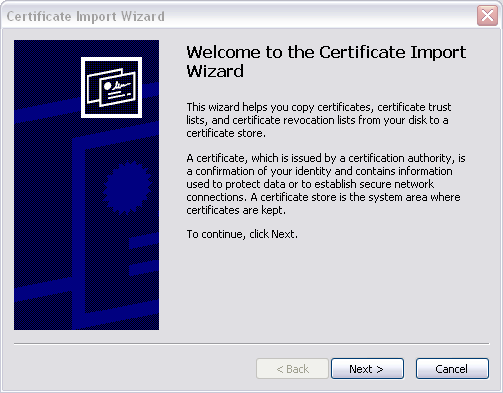
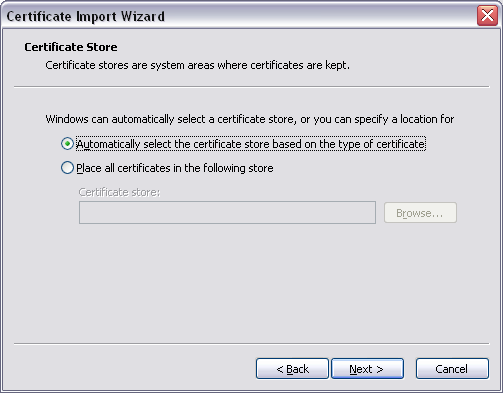
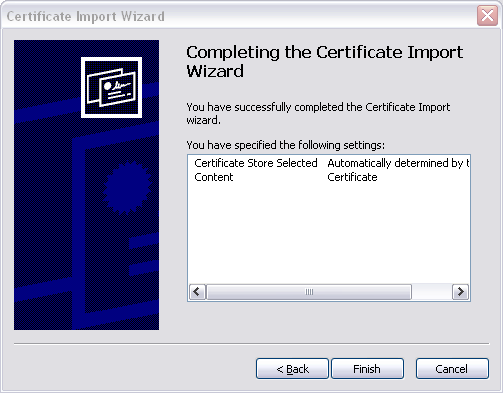
On the certificate page use the "Install Certificate" button, and follow the
wizard. Continue with the wizard accepting the default options (page1,
page2, page3), answer
Yes to the security warning and now the certificate
should be accepted.
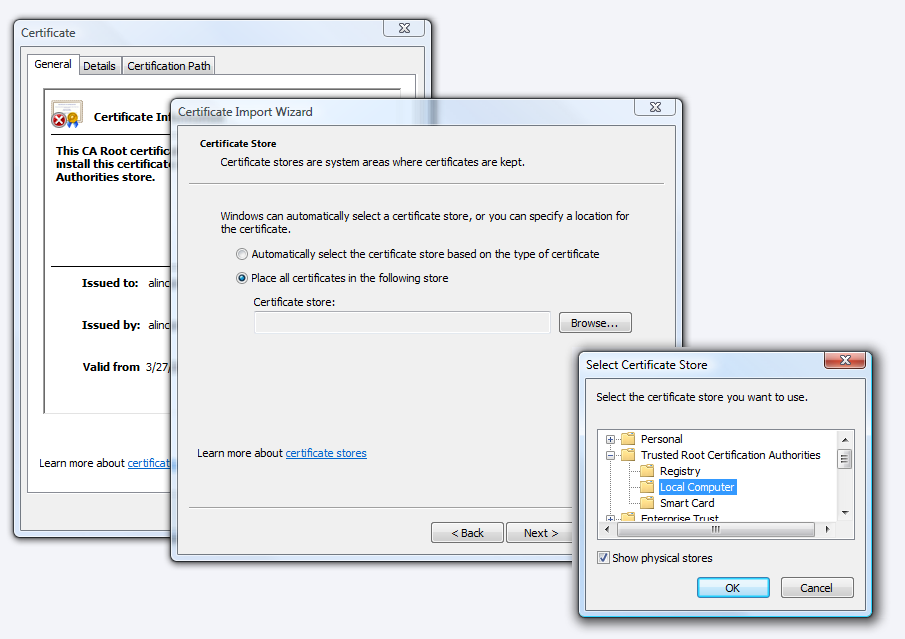
On Vista, if you run with UAC enabled the certificate page may not have an
Install button, like in the following picture.
 To install the certificate on Vista, make sure you are logged in using an
account in Administrators group. Also, make sure you start Internet Explorer
7.0 elevated by right clicking the IE7 icon and specifying "Run as
Administrator" (doing this should display the Install button in the certificate
page.) Also, in the second page of the wizard, don't let the certificate be
placed automatically in a store based on the certificate type; make sure you
explicitely select the "Trusted Root Certification Authorithies/Local Computer"
store, as indicated in this picture page2 of the
wizard for Vista. (Failing to do this will make IE work without warning
only for the administrator accout.)
To install the certificate on Vista, make sure you are logged in using an
account in Administrators group. Also, make sure you start Internet Explorer
7.0 elevated by right clicking the IE7 icon and specifying "Run as
Administrator" (doing this should display the Install button in the certificate
page.) Also, in the second page of the wizard, don't let the certificate be
placed automatically in a store based on the certificate type; make sure you
explicitely select the "Trusted Root Certification Authorithies/Local Computer"
store, as indicated in this picture page2 of the
wizard for Vista. (Failing to do this will make IE work without warning
only for the administrator accout.)
After this if you try to browse the server's URL using https you should not
receive the warning anymore.
-
On the server, open SourceSafe Administrator again, open the database using the
network share (\\ALINC-HOME\VssDB), open the Server/Configure dialog and check
"Require secure communication using SSL" checkbox. Click the Ok button and the
web service should be enabled for SSL.
Note: If you get an error message that SSL could not be enforced and the
service is disabled, verify again the settings from step 2 and 3. Make sure you
have the right server name in the Service URL edit field, restart SSAdmin
program (so it won't have cached connections, etc) and try again.
-
Repeat step 3, this time on the client machine. This will take care of the
certificate being trusted by the client. Note that before this step, if you
tried to use the web service on the client from VisualStudio the connection
would hava failed with various error messages. (If you attempted the connection
and failed you may need to restart VisualStudio or wait 30 seconds for the
VisualStudio cached connection status to expire).
-
After the previous step the connection should work again, this time using HTTPS
protocol. Note that because you still have provider's Advanced options set not
to use SSL by default, VisualStudio will still make one HTTP request to the
server, will discover that SSL is required by the server and will switch to
HTTPS protocol. From now on, only HTTPS will be used to talk to the server
(until VisualStudio is restarted, when the process will repeat). One other
downside of working in this configuration is that VSS web service will still
use the Windows account used to authenticate with the server
(ALINC-HOME\Administrator) as a VSS user name (Administrator). So now it's
finally the time to change that... Open the VSS Internet plugin Advanced page,
check the "Always use SSL to connect to the server" checkbox and click Ok in
the Advanced options dialog.
You can also change the VSS username in the Login ID field if you like. I
choose the VSS Guest account. From now on, VisualStudio will prompt for
passwords for VSS accounts, and will pass the VSS usernames and passwords to
the web service through the secure channel. The web service will then use this
account to open the VSS database. Note that the account used to authenticate
with the server (ALINC-HOME\Administrator) will continue to be used when the
server will verify the permissions for the NTFS folder and database share.
Notes about the VSS web service
-
The VSS web service can be used with IIS installed on different ports. When
enabling the service you will need to specify in SSAdmin/Server/Configure the
server URL like 'alinconstantin.dtdns.net:81'. Also, when you're adding the
database on the client, you'll have to use a similar server:port combination in
the AddDatabase wizard. Notice that when ports different than default (80=http,
443==https) are used, VisualStudio will attemp to connect to the same port, no
matter whether SSL is required or not.
-
SourceSafe Administrator can be used to enable the web service only on a
website that has the ID==1. This forum post explains how to
edit the website's metabase file in IIS to change the site ID
if needed.
-
If everything else failed, you can try to enable the web service manually. This
article describes how to
Enable Remote Access Manually
on the server.
Further problems?
This page is not a definitive guide of setting up VSS Internet service.
There are a lot of error codes and issues you may run into that are not covered in this guide.
I don't work anymore for SourceSafe and my time for support is limited, so don't e-mail me expecting timely answers.
If you still have further problems enabling the VSS web service:
-
Contact VSS Support team in
SourceSafe and SourceControl Forum. Search the forum before
posting, other users may have hit the same problem and found the solution
already.
-
Peek in the IIS log files (make sure to enable logging Win32 error codes, too).
Use tools like Fiddler
to monitor the HTTP/HTTPS traffic to the service from both InternetExplorer and
VisualStudio. The error codes may indicate what the problem is.
Translations, related articles
(Back
to SourceSafe and source control integration page)